tisdag 8 december 2020

Implementing Drive API v3 in Android

 Documentation be found at https://developers.google.com/resources/api-libraries/documentation/drive/v3/java/latest/overview-summary.html

API version was Drive API v3 (Rev. 197) 1.25.0 when this was written.


First off we need to solve the authorization and enable the Drive API for the app.

There’s a quickstart guide at https://developers.google.com/drive/api/v3/enable-drive-api for how to enable it.


Part 1 - Authorization

First we need to implement these three libraries inside the project.

compile 'com.google.android.gms:play-services-auth:19.0.0'

compile 'com.google.api-client:google-api-client:1.22.0'

compile 'com.google.api-client:google-api-client-android:1.22.0'


I made a simple SignInHelper.class to help with the authorization request.

SignInHelper.class


import android.content.Context;
import android.content.Intent;
import android.widget.Toast;
import com.google.android.gms.auth.api.signin.GoogleSignIn;
import com.google.android.gms.auth.api.signin.GoogleSignInAccount;
import com.google.android.gms.auth.api.signin.GoogleSignInClient;
import com.google.android.gms.auth.api.signin.GoogleSignInOptions;
import com.google.android.gms.auth.api.signin.GoogleSignInStatusCodes;
import com.google.android.gms.common.api.Scope;
import com.google.api.services.drive.DriveScopes;

public class SignInHelper {
    public static final int REQUEST_CODE_SIGN_IN = 20;

    private GoogleSignInAccount account;
    private GoogleSignInClient client;


    public SignInHelper(Context context)
    {
        this.account = GoogleSignIn.getLastSignedInAccount(context);
    }
    // More info about the DriveScopes at
    // https://developers.google.com/resources/api-libraries/documentation/drive/v3/java/latest/com/google/api/services/drive/DriveScopes.html

    public boolean isSignedIn() {
        return (account != null && account.getGrantedScopes().contains(DriveScopes.DRIVE_FILE));
    }

    public Intent startSignIn(Context context) {
        buildGoogleSignInClient(context);
        return client.getSignInIntent();
    }

    private void buildGoogleSignInClient(Context context) {
        GoogleSignInOptions signInOptions =
                new GoogleSignInOptions.Builder(GoogleSignInOptions.DEFAULT_SIGN_IN)
                        .requestEmail()
                        .requestScopes(new Scope(DriveScopes.DRIVE_FILE))
                        .build();

        client =  GoogleSignIn.getClient(context, signInOptions);
    }

    public GoogleSignInAccount getAccount() {
        return account;
    }

    public void setAccount(GoogleSignInAccount account)
    {
        this.account = account;
    }

    public void parseErrorMessage(String message, Context context) {
        int errorCode = Integer.parseInt(message.replaceAll("[^\\d]", ""));
        switch (errorCode) {
            case GoogleSignInStatusCodes.SIGN_IN_CANCELLED:
                Toast.makeText(context, "No account selected.", Toast.LENGTH_LONG).show();
                break;
            case GoogleSignInStatusCodes.SIGN_IN_FAILED:
                Toast.makeText(context, "Login failed. Application authorized?", Toast.LENGTH_LONG).show();
                break;
            default:
                Toast.makeText(context, "Error: " + message, Toast.LENGTH_LONG).show();
        }
    }
}

Next we need a class that can talk to the Drive API, Google has made a simple one at

I'll shorten it for this blog post, only function will be to send an array of bytes.
DriveServiceHelper.java
package com.elluid.drivesample.drive;

/**
 * Copyright 2018 Google LLC
 *
 * Licensed under the Apache License, Version 2.0 (the "License");
 * you may not use this file except in compliance with the License.
 * You may obtain a copy of the License at
 *
 * http://www.apache.org/licenses/LICENSE-2.0
 *
 * Unless required by applicable law or agreed to in writing, software
 * distributed under the License is distributed on an "AS IS" BASIS,
 * WITHOUT WARRANTIES OR CONDITIONS OF ANY KIND, either express or implied.
 * See the License for the specific language governing permissions and
 * limitations under the License.
 */
import android.app.Activity;
import com.google.android.gms.auth.api.signin.GoogleSignInAccount;
import com.google.android.gms.tasks.Task;
import com.google.android.gms.tasks.Tasks;
import com.google.api.client.googleapis.extensions.android.gms.auth.GoogleAccountCredential;
import com.google.api.client.http.ByteArrayContent;
import com.google.api.client.http.javanet.NetHttpTransport;
import com.google.api.client.json.gson.GsonFactory;
import com.google.api.services.drive.Drive;
import com.google.api.services.drive.DriveScopes;
import com.google.api.services.drive.model.File;

import java.util.Collections;
import java.util.concurrent.Executor;
import java.util.concurrent.Executors;

public class DriveServiceHelper {
    private final Executor mExecutor = Executors.newSingleThreadExecutor();
    private final Drive mDriveService;

    private DriveServiceHelper(Drive driveService) {
        mDriveService = driveService;
    }

    public Task<String> sendFile(String name, byte[] bytes) {
        return Tasks.call(mExecutor, () -> {
            File metadata = new File().setName(name);
            metadata.setName(name);
            ByteArrayContent contentStream = new ByteArrayContent("text/plain", bytes);
            mDriveService.files().create(metadata, contentStream).execute();
            return name;
        });
    }

    public static DriveServiceHelper getDriveServiceHelper(GoogleSignInAccount googleSignInAccount, Activity activity) {
        GoogleAccountCredential credential = GoogleAccountCredential.usingOAuth2(
                activity, Collections.singleton(DriveScopes.DRIVE_FILE));
        credential.setSelectedAccount(googleSignInAccount.getAccount());
        Drive googleDriveService = new Drive.Builder(new NetHttpTransport.Builder().build(),
                new GsonFactory(), credential)
                .setApplicationName("Drive Sample")
                .build();
        return new DriveServiceHelper(googleDriveService);
    }
}
DRIVE_FILE will only give permission to manage and view the files created by the app.

Authorization and a simple Drive API class ready to be used inside an activity. Lets start with a simple layout with a 'Connect' button, a textview for Drive Status and another button to send some sample data.

activity_main.xml
Paste your text here.<?xml version="1.0" encoding="utf-8"?>
<androidx.constraintlayout.widget.ConstraintLayout xmlns:android="http://schemas.android.com/apk/res/android"
    xmlns:app="http://schemas.android.com/apk/res-auto"
    xmlns:tools="http://schemas.android.com/tools"
    android:layout_width="match_parent"
    android:layout_height="match_parent"
    tools:context=".MainActivity">

    <TextView
        android:id="@+id/drive_status"
        android:layout_width="wrap_content"
        android:layout_height="wrap_content"
        android:visibility="gone"
        style="@style/TextAppearance.AppCompat.Headline"
        app:layout_constraintTop_toTopOf="parent"
        app:layout_constraintStart_toStartOf="parent"
        app:layout_constraintEnd_toEndOf="parent"/>

    <Button
        android:id="@+id/button_send_data"
        android:layout_width="wrap_content"
        android:layout_height="wrap_content"
        android:text="Send sample data."
        android:visibility="gone"
        app:layout_constraintStart_toStartOf="parent"
        app:layout_constraintEnd_toEndOf="parent"
        app:layout_constraintTop_toBottomOf="@id/drive_status"/>

    <Button
        android:id="@+id/button_connect"
        android:layout_width="wrap_content"
        android:layout_height="wrap_content"
        android:text="Connect to Drive"
        app:layout_constraintBottom_toBottomOf="parent"
        app:layout_constraintLeft_toLeftOf="parent"
        app:layout_constraintRight_toRightOf="parent"
        app:layout_constraintTop_toTopOf="parent" />

</androidx.constraintlayout.widget.ConstraintLayout>
And finally the activity that uses it all. 
MainActivity.java
package com.elluid.drivesample;

import androidx.annotation.NonNull;
import androidx.appcompat.app.AppCompatActivity;
import android.content.Intent;
import android.os.Bundle;
import android.view.View;
import android.view.View.OnClickListener;
import android.widget.Button;
import android.widget.TextView;
import android.widget.Toast;

import com.elluid.drivesample.drive.DriveServiceHelper;
import com.elluid.drivesample.drive.SignInHelper;
import com.google.android.gms.auth.api.signin.GoogleSignIn;
import com.google.android.gms.auth.api.signin.GoogleSignInAccount;
import com.google.android.gms.tasks.OnCompleteListener;
import com.google.android.gms.tasks.OnFailureListener;
import com.google.android.gms.tasks.OnSuccessListener;
import com.google.android.gms.tasks.Task;
import static com.elluid.drivesample.drive.SignInHelper.REQUEST_CODE_SIGN_IN;

public class MainActivity extends AppCompatActivity {

    private SignInHelper signInHelper;
    private TextView textviewDriveStatus;
    private Button buttonSendData;

    @Override
    protected void onActivityResult(int requestCode, int resultCode, Intent data) {
        super.onActivityResult(requestCode, resultCode, data);
        switch (requestCode)
        {
            case REQUEST_CODE_SIGN_IN:
                handleSignInResult(data);
                break;
        }
    }

    @Override
    protected void onCreate(Bundle savedInstanceState) {
        super.onCreate(savedInstanceState);
        setContentView(R.layout.activity_main);
        textviewDriveStatus = findViewById(R.id.drive_status);
        buttonSendData = findViewById(R.id.button_send_data);
        findViewById(R.id.button_connect).setOnClickListener(new OnClickListener() {
            @Override
            public void onClick(View v) {
                signIn();
            }
        });

        buttonSendData.setOnClickListener(new OnClickListener() {
            @Override
            public void onClick(View v) {
                sendSampleData();
            }
        });
    }

    private void signIn() {
        if(signInHelper == null)
            signInHelper = new SignInHelper(MainActivity.this);
        if(signInHelper.isSignedIn()) {
            updateDriveStatus();
        } else {
            Intent startSignIn = signInHelper.startSignIn(this);
            startActivityForResult(startSignIn, REQUEST_CODE_SIGN_IN);
        }
    }

    private void handleSignInResult(Intent result) {

        GoogleSignIn.getSignedInAccountFromIntent(result).addOnSuccessListener(new OnSuccessListener<GoogleSignInAccount>() {
                    @Override
                    public void onSuccess(GoogleSignInAccount googleSignInAccount) {
                        signInHelper.setAccount(googleSignInAccount);
                        updateDriveStatus();
                    }
                })
                .addOnFailureListener(new OnFailureListener() {
                    @Override
                    public void onFailure(@NonNull Exception e) {
                        signInHelper.parseErrorMessage(e.getMessage(), MainActivity.this);
                    }
                });
    }

    private void updateDriveStatus()
    {
        textviewDriveStatus.setText("Authorized for Drive usage!");
        textviewDriveStatus.setVisibility(View.VISIBLE);
        buttonSendData.setVisibility(View.VISIBLE);
    }

    private void sendSampleData()
    {
        DriveServiceHelper driveServiceHelper = DriveServiceHelper.getDriveServiceHelper(signInHelper.getAccount(), this);
        String testData = "Hi Drive! \n I Hope this arrives safe and sound. \n Regards, Elluid";
        Task<String> uploadTask = driveServiceHelper.sendFile("sample.txt", testData.getBytes());

        uploadTask.addOnCompleteListener(new OnCompleteListener<String>() {
            @Override
            public void onComplete(@NonNull Task<String> task) {
                if(task.isSuccessful()) {
                    Toast.makeText(getBaseContext(), task.getResult() + " sent successfully.", Toast.LENGTH_LONG).show();
                } else {
                    Toast.makeText(getBaseContext(), "Error:" + task.getException().getMessage(), Toast.LENGTH_LONG).show();
                }
            }
        });
    }
}
Had to rewrite mine recently as i was using v2. Correct me or ask question in the comments and i need to continue my Kotlin route. Still feels more normal to use Java, so many different special ways to handle things in Kotlin but i'm trying.. 

Hope it helps someone!

Full project can be found at https://github.com/elluid-data/drive-sample.


torsdag 11 februari 2016

Android : Using HttpURLConnection instead of Apache httpClient

As of Android 6.0 Google has removed support for the Apache HTTP client.

Quote from http://developer.android.com/about/versions/marshmallow/android-6.0-changes.html

Apache HTTP Client Removal

Android 6.0 release removes support for the Apache HTTP client. If your app is using this client and targets Android 2.3 (API level 9) or higher, use the HttpURLConnection class instead. This API is more efficient because it reduces network use through transparent compression and response caching, and minimizes power consumption. To continue using the Apache HTTP APIs, you must first declare the following compile-time dependency in your build.gradle file:
android {
    useLibrary 'org.apache.http.legacy'
}

This post will help you with the basics of HttpURLConnection.
First example just loads a simple url, second sends a POST to automatically login.

Connecting to simple page is simple, lets create a helper class. Notice, these are just examples, exceptions are not handled, internet connectivity is not checked.

HttpWorker.java
package se.adanware.httptest.example;

import java.io.BufferedReader;
import java.io.IOException;
import java.io.InputStream;
import java.io.InputStreamReader;
import java.net.*;

public class HttpWorker {

    private URLConnection urlConnection;
    private URL myUrl;
    private String htmlData;


    public boolean connect(String url) throws IOException
    {
        myUrl = new URL(url);
        urlConnection = myUrl.openConnection();
        htmlData = convertStreamToString(urlConnection.getInputStream());
        return true;
    }


    private String convertStreamToString(InputStream is) throws IOException {

        if (is != null) {
            BufferedReader reader;
            StringBuilder data = new StringBuilder();
            try
            {
                reader = new BufferedReader(new InputStreamReader(is, "ISO-8859-1"));

                String inputLine;
                while ((inputLine = reader.readLine()) != null)
                {
                    data.append(inputLine + "\n");
                }
            }
            finally
            {

                is.close();
            }
            return data.toString();
        } else {
            return "";
        }
    }
}

Lets use it in an Activity. Remember we can't run in on the main thread, we'll create a simple AsyncTask to do the work, i'll make it as barebone as possible.

MainActivity.java
package se.adanware.httptest.example;

import android.os.AsyncTask;
import android.support.v7.app.AppCompatActivity;
import android.os.Bundle;
import android.util.Log;

public class MainActivity extends AppCompatActivity {
    private HttpWorker httpWorker;

    @Override
    protected void onCreate(Bundle savedInstanceState) {
        super.onCreate(savedInstanceState);
        setContentView(R.layout.activity_main);
        new ExampleTask().execute("https://stackoverflow.com/users/login?ssrc=head");
    }

    private class ExampleTask extends AsyncTask<String,Void,Void>
    {
        protected Void doInBackground(String... urls) {
            httpWorker = new HttpWorker();
            try {
                httpWorker.connect(urls[0]);
            }
            catch (Exception e)
            {
                // Just an example, we just swallow. : )
            }
        }

        protected void onProgressUpdate(Void... progress) {
            // Just an example.
        }

        protected void onPostExecute(Void result) {
            Log.d("HttpWorker-Example", "Set breakpoint somewhere to inspect htmldata.");
        }
    }
}

All right, we got the html data from StackOverflow login page. Lets say we don't have an API to work with and we like to do a POST to automatically login to parse some data.

Fiddler is the program to use to track all post values and post urls.

Their first login form post query is as follows :
isSignup=false&isLogin=true&isPassword=false&isAddLogin=false&hasCaptcha=false&fkey=loooong&ssrc=head&email=myemail@somewhere.com&password=mypassword&submitbutton=Log+in&oauthversion=&oauthserver=&openidusername=&openididentifier=

Login page will also make a second post with another query, it's about the same minus a few variables. Download Fiddler and you can track the whole login process.
So, fkey value need to be parsed but the rest is static, lets rewrite our HttpWorker class.

package se.adanware.httptest.example;

import android.net.Uri;

import javax.net.ssl.HttpsURLConnection;
import java.io.*;
import java.net.*;
import java.util.regex.Matcher;
import java.util.regex.Pattern;

public class HttpWorker {

    private HttpsURLConnection urlConnection;
    private URL myUrl;
    private String htmlData;
    private String htmlData_MAINPAGE;

    private static String POST_URL_1ST = "https://stackoverflow.com/users/login-or-signup/validation/track";
    private static String POST_URL_2ND = "https://stackoverflow.com/users/login?ssrc=head";
    private static String URL_MAINPAGE = "https://stackoverflow.com";
    private String fkey_value;

    public HttpWorker()
    {
        CookieHandler.setDefault( new CookieManager( null, CookiePolicy.ACCEPT_ALL ) );
    }

    public boolean connect(String url) throws IOException
    {
        myUrl = new URL(url);
        urlConnection = (HttpsURLConnection) myUrl.openConnection();
        htmlData = convertStreamToString(urlConnection.getInputStream());
        fkey_value = parsefkeyValue(htmlData);
        return true;
    }

    public void login(String username, String password) throws IOException
    {
        URL loginPostURL = new URL(POST_URL_1ST);

        urlConnection = (HttpsURLConnection) loginPostURL.openConnection();
        // Simple to build query with Uri.Builder
        Uri.Builder builder = new Uri.Builder()
                .appendQueryParameter("isSignup", "false")
                .appendQueryParameter("isLogin", "true")
                .appendQueryParameter("isAddLogin", "false")
                .appendQueryParameter("hasCaptcha", "false")
                .appendQueryParameter("fkey", fkey_value)
                .appendQueryParameter("ssrc", "head")
                .appendQueryParameter("email", username)
                .appendQueryParameter("password", password)
                .appendQueryParameter("submitbutton", "Log in")
                .appendQueryParameter("oauth_version", "")
                .appendQueryParameter("oauth_server", "")
                .appendQueryParameter("openidusername", "")
                .appendQueryParameter("openididentifier", "");

        String query = builder.build().getEncodedQuery();
        urlConnection.setRequestMethod("POST");
        urlConnection.setRequestProperty("Content-Type","application/x-www-form-urlencoded");
        urlConnection.setDoInput(true);
        urlConnection.setDoOutput(true);
        sendPostParams(urlConnection.getOutputStream(), query);
        String LOGIN_STATUS = convertStreamToString(urlConnection.getInputStream());
        // Check the reply, do the repost if login sucessful.
        if(LOGIN_STATUS.contains("Login-OK"))
        {
            loginPostURL = new URL(POST_URL_2ND);
            urlConnection = (HttpsURLConnection) loginPostURL.openConnection();
            builder = new Uri.Builder()
                    .appendQueryParameter("fkey", fkey_value)
                    .appendQueryParameter("ssrc", "head")
                    .appendQueryParameter("email", username)
                    .appendQueryParameter("password", password)
                    .appendQueryParameter("oauth_version", "")
                    .appendQueryParameter("oauth_server", "")
                    .appendQueryParameter("openidusername", "")
                    .appendQueryParameter("openididentifier", "");

            urlConnection.setRequestMethod("POST");
            urlConnection.setRequestProperty("Content-Type","application/x-www-form-urlencoded");
            urlConnection.setDoInput(true);
            urlConnection.setDoOutput(true);
            sendPostParams(urlConnection.getOutputStream(), builder.build().getEncodedQuery());

            htmlData = convertStreamToString(urlConnection.getInputStream());
            URL mainPage = new URL(URL_MAINPAGE);
            urlConnection = (HttpsURLConnection) mainPage.openConnection();
            htmlData_MAINPAGE = convertStreamToString(urlConnection.getInputStream());
        } 

    }

    private void sendPostParams(OutputStream os, String params) throws IOException
    {
        BufferedWriter writer = new BufferedWriter(new OutputStreamWriter(os, "UTF-8"));
        writer.write(params);
        writer.flush();
        writer.close();
        os.close();
    }

    private String convertStreamToString(InputStream is) throws IOException {

        if (is != null) {
            BufferedReader reader;
            StringBuilder data = new StringBuilder();
            try
            {
                reader = new BufferedReader(new InputStreamReader(is, "ISO-8859-1"));

                String inputLine;
                while ((inputLine = reader.readLine()) != null)
                {
                    data.append(inputLine + "\n");
                }
            }
            finally
            {

                is.close();
            }
            return data.toString();
        } else {
            return "";
        }
    }

    private String parsefkeyValue(String data)
    {
        Pattern myPattern = Pattern.compile("fkey\" value=\"([^\"]*)\"", Pattern.CASE_INSENSITIVE);
        Matcher ma = myPattern.matcher(data);
        if(ma.find())
            return ma.group(1);
        else
            return null;
    }
}

Let's try it out by adding httpWorker.login("my@mail.com, "myPassword"); after the connect method. Set a breakpoint after
htmlData_MAINPAGE = convertStreamToString(urlConnection.getInputStream()); 
to inspect the htmlData_MAINPAGE, you should see in the source a link to your user page etc.

It's a bit different from using Apaches HttpPost and the reference documentation doesn't explain it so well.

Hopefully it'll help someone!


onsdag 26 augusti 2015

Misc : Home improvement, office space!


The new work room have been completed for awhile, all electrics been re-installed inside the walls.
Earlier installation was surface mounted inside a plasted channel. Thumbs up for Schneider Electrics, love their Exxact series. Everything you need in the same design from network, knx to general power outlets. Can also be styled by using different frames. Been using these in 2 rooms and our bathroom as of now.


Behind the computer, 2xCAT6 going to the patch panel in the bedroom.


I'll be writing more of Android soon, trying to catch up with 5.0 now when 6.0 is almost released. : )
Finally bought a new phone so i can see all the Material Design in action on a physical device.

One app updated with the new design guidelines and plenty of work left on Colorful Budget.

söndag 12 oktober 2014

Android : Importing (older) Android gradle projects in IntelliJ IDEA

This is a simple tutorial, i'll start with an Android sample, download 'SlidingTabsBasic' from http://developer.android.com/downloads/samples/SlidingTabsBasic.zip.

Projects built with an older android gradle plugin and build-tools needs to be updated.


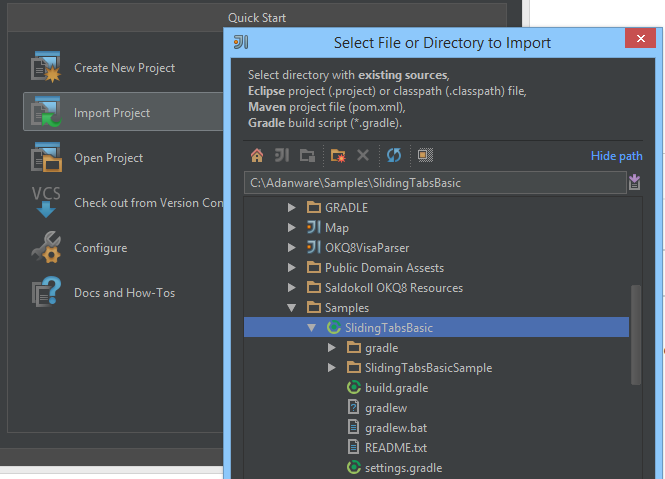
First off, start IntelliJ IDEA and select 'Import Project', select the directory where you've unzipped the project.

IDEA auto-selects it as a 'Gradle' project as in the following screenshot.


We'll go with the default settings, and click 'Finish'. Depending on what packages you've installed from the Android SDK you've might get a first error.


The build tools version specified in SlidingTabsBasicSample\build.gradle isn't installed on my computer, i'm currently using 19.1, but it depends, open up your Android SDK manager and see which one you've installed.

File build.gradle updated with a newer build tools version, click open the 'Gradle' tab and hit refresh. Next error comes along, these samples were created with an older Android plugin for Gradle.

Error: 'The project is using an unsupported version of the Android Gradle plug-in (0.9.2)'

In the same file update the line classpath 'com.android.tools.build:gradle:0.9.+' to a newer plugin version, as of this writing i'll use 'com.android.tools.build:gradle:0.12.2'. Hit refresh again.

Finally the project builds sucessfully, Now we'll create the 'Run/Debug Configurations'.
Select Run -> Edit Configurations


IDEA should pick up and select the default settings, select a emulator image, and run the project!
Hopefully this will help out when trying out samples made with an older version of the build-tools and the android gradle plugin.


lördag 23 augusti 2014

Android : IntelliJ, Gradle & Signing

IntelliJ IDEA now offers good IDE support for Gradle. We can just go through their 'New Project', select an 'Gradle: Android Module' and project is up and running.


Signing applications need a bit more work though, IDEA points us to Gradle Plugin User Guide.

Default gradle build script in IDEA:
buildscript {
    repositories {
        mavenCentral()
    }
    dependencies {
        classpath 'com.android.tools.build:gradle:0.9.+'
    }
}
apply plugin: 'android'

repositories {
    mavenCentral()
}

android {
    compileSdkVersion 20
    buildToolsVersion "19.0.0"

    defaultConfig {
        minSdkVersion 11
        targetSdkVersion 19
        versionCode 1
        versionName "1.0"
    }
    buildTypes {
        release {
            runProguard false
            proguardFiles getDefaultProguardFile('proguard-android.txt'), 'proguard-rules.txt'
        }
    }
}

dependencies {
    compile fileTree(dir: 'libs', include: ['*.jar'])
    compile 'com.android.support:appcompat-v7:19.+'
}

We need to add the container signingConfigs { }.
Example build.gradle file:
buildscript {
    repositories {
        mavenCentral()
    }
    dependencies {
        classpath 'com.android.tools.build:gradle:0.9.+'
    }
}
apply plugin: 'android'

repositories {
    mavenCentral()
}

android {
    compileSdkVersion 20
    buildToolsVersion "19.0.0"

    signingConfigs {
        debug {
             // Debug - uses default debug keystore
        }

        release {
                storeFile file("C:\\Android\\Key\\keystore")
                storePassword "myPassword"
                keyAlias "key0"
                keyPassword "testPassword"
            }

    }

    defaultConfig {
        minSdkVersion 11
        targetSdkVersion 19
        versionCode 1
        versionName "1.0"
    }

    buildTypes {
        release {
            runProguard true
            proguardFiles getDefaultProguardFile('proguardandroid.txt'), 'proguard-rules.txt'
            signingConfig signingConfigs.release
            zipAlign true
        }
    }
}

dependencies {
    compile fileTree(dir: 'libs', include: ['*.jar'])
    compile 'com.android.support:appcompat-v7:19.+'
}

As you can see we've added a 'signingConfig' flag in the release build type.
You can also add a debug {} under buildTypes if you want to add or change something in the debug build.
Example:
 buildTypes {
        debug {
            println "Building DEBUG release."
            println "Run ProGuard == TRUE"
            runProguard true
        }
        release {
            runProguard true
            proguardFiles getDefaultProguardFile('proguard-android.txt'), 'proguard-rules.txt'
            signingConfig signingConfigs.release
            zipAlign true
        }
    }

As you can see we've enabled Proguard in the debug release.

Run 'PROJECT_HOME\gradlew.bat tasks' for a complete list of different tasks to do or build or open the Gradle tab in IntelliJ IDEA.


I've marked signingReport as it'll display your key status. You can run it directly from IntelliJ IDEA or from your favorite shell.

As you can see we get a complete report of the key store. Wrong password or missing file etc.
When everything is working as it should. Just hit 'gradlew.bat install<yourTask>' to install the signed version of your app on the emulator or a physical device.

I'll update this post as i play more with Gradle!

torsdag 12 juni 2014

Android : Importing Google Play Services API in IntelliJ IDEA


I'll be using an gradle built Android module. First create an empty Android project.

Now we need to setup the dependecies, http://developer.android.com/google/play-services/setup.html.
This first way is the easy way, edit the 'build.gradle' in the DriveTest directory and add:
dependencies {
    compile 'com.android.support:appcompat-v7:19.+'
    compile 'com.google.android.gms:play-services:4.4.52'
}

Lastly open the AndroidManifest.xml for the Android module and add the following as a child under the <application> tag:
<meta-data android:name="com.google.android.gms.version"
                   android:value="@integer/google_play_services_version" />

Afterwards you should be able to auto-complete the dependencies in the IDE.

Another way is to copy the file from 'sdk\extras\google\m2repository\com\google\android\gms\play-services\4.4.52\play-services-4.4.52.aar' to your android modules lib folder then update your build.gradle scripts with the following :
repositories {
    flatDir()
            {
                dirs 'libs'
            }
}
dependencies {
    compile ':play-services:4.4.52@aar'
}


Troubleshooting :
Make sure you have the following installed in the Android SDK.

Be sure to check min-sdk version in your AndroidManifest.xml and build.gradle files. 9 at least.

Remember that Google Play Services work inside the emulator these days, just make an AVD that runs the Google APIs with version 4.2.2 and above. Just be sure to sign the application, i use the command line when installing a signed package as IDEA has no auto-installation when building. (what i've found)

Quickest route for me, uninstalling my debug installation first. Then installing the signed release.


lördag 7 december 2013

Android : Working with Bluetooth

I've been doing some research on using Android API for Bluetooth as i wanted to have a sync function in my app by pairing the devices.

I started at Googles Android Bluetooth guide located at http://developer.android.com/guide/topics/connectivity/bluetooth.html. It explains the basics and with some helpful code snippets. Easy to make an device discoverable but the connection handshake didn't really work well for me in my play project using AsyncTask instead of spawning threads.

So i've compiled the BluetoothChat example that comes with the SDK to see how they did it.
Simple and easy, example can be found online here.

Messages was really easy to send between the devices but i wanted to send a file.

Excerpt from BluetoothChatService.java:
 public void run() {
            Log.i(TAG, "BEGIN mConnectedThread");
            byte[] buffer = new byte[1024];
            int bytes;

            // Keep listening to the InputStream while connected
            while (true) {
                try {
                    // Read from the InputStream
                    bytes = mmInStream.read(buffer);

                    // Send the obtained bytes to the UI Activity
                    mHandler.obtainMessage(BluetoothChat.MESSAGE_READ, bytes, -1, buffer)
                            .sendToTarget();
                } catch (IOException e) {
                    Log.e(TAG, "disconnected", e);
                    connectionLost();
                    // Start the service over to restart listening mode
                    BluetoothChatService.this.start();
                    break;
                }
            }
        }

As you can see it reads the buffer than send the bytes back to activity. I found a nice little Bluetooth library for sending files located at https://github.com/simonguest/android-btxfr/tree/master/src/com/simonguest/btxfr.
Locate DataTransferThread.java to see his elegant solution.

With help from that i implemented the same thing thing he did but in BluetoothChatService. Send filesize, run until data received send it back to the activity. Read it, import it then re-send data to the device that clicked 'Sync'.

Hope this will help those of you that don't want to use the native Bluetooth intent!


onsdag 20 november 2013

Android : What does your dev. station look like ?

Currently renovating my new 'computer room'.

Just need to do the electrical bit and then done. 2xCAT-6 for whatever reasons. Room will probably become a baby room in the distant future.
Enough about that, my current setup looks like this

Computer build to be silent, the monitor needs to be updated with two new ones someday, like to see if it you gain some effectiveness. Must be nice to see the code while your reading up on something. Included a picture of my Berserk collection, #37 finally on the way! Hopefully Kentaro Miura can finish it, no end in sight and one volume a year.

On to the software side.

  •  IntelliJ IDEA 12.1 - I keep nagging about IDEA but it's my favorite IDE for Android, i tried Android Studio when it got released but need to wait until it gets a bit more mature.
  • Notepad++ - Switched over from regular Notepad because it doesn't understand the LF char. The config files included in Android tend to only have that.
  • Take Command - If you've used 4DOS/4NT in the old days this is it. Nice to have tab autocompletion in the command prompt, easily scriptable. Mostly started when i'm using 'adb shell', 
  • Spotify - Music in the background, when typing this, 'Of Monsters and Men'.

That's the programs i use to for my Android development. (Android SDK i didn't count) You might notice there's no external source control, i backup and date my project directory and use the local history in the IDE. Gonna start using one though, tips ? Tips for other big or small utility applications are welcome!

http://www.glitchthegame.com/ is all over the news, they've released all their game assets as public domain. Never heard of the game earlier but that's a really nice gesture, that's some nice art to start from or use.
I have a feeling their art will pop up in some form in more than a few games, which i guess is the case based on their headline, Glitch is Dead, Long Live Glitch!

måndag 20 maj 2013

Android Studio v0.1 - Yay, Google is co-operating with Jetbrains!

This is great news for all of us that prefer IntelliJ over Eclipse!

Jetbrains posted a little blogpost here about Android Studio and that it's based on the IntelliJ platform.
Just installed Android Studio and it looks exacly like IntelliJ IDEA. (Their Darcula theme is included.) Haven't played much with it yet as i had to write this to express my joy!

Opening Android projects created in IntelliJ worked without a hassle, had to re-specify the Android SDK but that's all.

The xml editor have gotten a little preview facelift, and ListViews now displays rows so you can see how it behaves, it also imports your "@string/"'s automatically in the XML, got fooled at first, thought i didn't hardcode that text.


It's nice to have the latest Android support in what probably will become my favorite IDE for Android! No more external linking to monitor.bat when they changed it in the SDK, etc.


Device selection forked, needs a bit more width, time to play around with it!

Download Android Studio v0.1 - HERE !

Presentation video:

onsdag 17 april 2013

Android : Managing shared libraries / resources with IntelliJ

A quick tutorial for getting you up and running with sharing libraries & resources across your Android projects with IntelliJ.

Lets start with an example, lets use https://github.com/SimonVT/android-calendarview. It's the new CalendarView which is backported for older Android versions.

Download and place it somewhere:
C:\Android\shared-libs\android-calendarview-master\

Now, rename the library directory inside the folder to something more descriptive, like 'calendarview'.
C:\Android\shared-libs\android-calendarview-master\calendarview

IntelliJ uses modules so we can't use the Eclipse structure.

Step 1: Import the Project.

Choose 'Import Project...' in IntelliJ.

Create project from existing sources. It should auto-detect it's an Android project, so click 'Next' until the project is opened. Next we need to make it a library.


Go to 'File -> Project Structure', choose 'Facets' and make sure 'Library Module' is ticked.

I'd recommened to create a README.TXT or the like if you need to alter your styles in the project we are going to use it in. 

Android 4.0 CalendarView backported to 2.2 Probably has to be built against API level 15

To use this library, it's required that the 1 attribute is added to your theme. 

<resources>

    <style name="SampleTheme" parent="@android:style/Theme">
        <item name="calendarViewStyle">@style/Widget.Holo.CalendarView</item>
    </style>

    <style name="SampleTheme.Light" parent="@android:style/Theme.Light">
        <item name="calendarViewStyle">@style/Widget.Holo.Light.CalendarView</item>
    </style>
</resources>

Okay, the module is ready to imported and used.

Create a new Android application, after it's been created go to 'Project Structure'.
Choose 'Modules', click the green '+' icon and choose 'Import module', choose the .IML file.

Next switch to our own module, called 'TestApp', hit the right green '+'-icon and click on 'Module Dependency...' and choose 'calendarview'.

Now to see if everything works, create a themes.xml in /values

<?xml version="1.0" encoding="utf-8"?>
<resources>
    <style name="MyTheme.Light" parent="@android:style/Theme.Light">
        <item name="calendarViewStyle">@style/Widget.Holo.Light.CalendarView</item>
    </style>
</resources>

Be sure to add your custom theme to the activity in the AndroidManifest.xml.

Now we'll just add the custom view in our layout file.

<?xml version="1.0" encoding="utf-8"?>
<LinearLayout xmlns:android="http://schemas.android.com/apk/res/android"
              android:orientation="vertical"
              android:layout_width="fill_parent"
              android:layout_height="fill_parent"
        >

    <TextView
            android:layout_width="fill_parent"
            android:layout_height="wrap_content"
            android:text="Hello World, MyActivity"
            />
    
    <net.simonvt.calendarview.CalendarView
            android:layout_width="match_parent"
            android:layout_height="250dp"
            />
</LinearLayout>

The module works, ready to be used and re-used in other projects! When creating a module as a 'Library' you can skip the hassle with copying the correct resources, values, etc to your project.


fredag 8 februari 2013

Android : Fragments (a reminder)

Everyone is propably used to fragments by now, this is a quick reminder what methods to override for different purposes. Google has two helpful pages on fragments, the reference class page for Fragment, can be found here http://developer.android.com/reference/android/app/Fragment.html and their general for Fragments, http://developer.android.com/guide/components/fragments.html.

This will be a shortpacked for most methods i usually override as a reminder for myself!

Keyboard shortcuts to open the generate code dialog is  ALT + Insert for IntelliJ IDEA

ALT + Shift + S for Eclipse users.

Screenshot from IntelliJ IDEA.


src/MyFragment.java
import android.app.Activity;
import android.app.Fragment;
import android.os.Bundle;
import android.view.LayoutInflater;
import android.view.View;
import android.view.ViewGroup;


/**
 *  MyFragment - Does Exactly Nothing! :)
 */
public class MyFragment extends Fragment {

    private IUpdate myListener;

    @Override
    public void onAttach(Activity activity) {
        super.onAttach(activity);
        // We have any listeners that need to communicate
        // with our activity, lets attach them here.
        myListener = (IUpdate) activity;
    }

    @Override
    public View onCreateView(LayoutInflater inflater, ViewGroup container, Bundle savedInstanceState) {
        // A custom xml view involved
        // Lets inflate it here!
        return inflater.inflate(R.layout.secret_layout, container, false);
    }

    @Override
    public void onActivityCreated(Bundle savedInstanceState) {
        super.onActivityCreated(savedInstanceState);
        // Manage & find all the containers/widgets
        // in our layout.
        View myView = getView();
    }

    @Override
    public void onResume() {
        super.onResume();
        // We have something that might have changed while coming back
        // from another view? Settings ? Lets check & then update.
    }

    @Override
    public void onSaveInstanceState(Bundle outState) {
        super.onSaveInstanceState(outState);
        // If our activity gets destroyed.
        // I.e we changed from portrait to landscape.
        // Anything we need to remember ?
        //
        // Remember, this do not get called just by hiding your view!
        // It's the activity it depends on.
    }
}

This should be methods i tend to override depending on what i'm doing when i'm creating a new Fragment.
A small skeleton fragment to keep me on track, hopefully it's helpful!

Now, family time!

fredag 21 december 2012

Android : IntelliJ IDEA 12 released!

Wow ! Finally a built-in dark UI for my favorite IDE and also a pretty extensive GUI editor for the XML layout.


Still prefer to do it the 'manual way' through XML, more control and feels kinda clunky to drag them to the correct place with the layout attributes i want, but it's a nice addition and you can quickly see the properties of each layout item. It auto-completes in xml editing mode but sometimes my mind doesn't work as i want it to, i.e i forget what i'm looking for :) Preview mode has alot of options where you can configure screensizes, Android version and themes, it's also available when typing manually.
Easily compile directly from the IDE, including signing and obfuscation with Proguard, Logcat is incorporated for easy access. Rest of the external tools is available from the toolbar.

Run configurations:


The IDE feels alot more intelligent than Eclipse. Codecompletion, imports, refactoring and the UI.
Best thing for me is their new sleek 'Darcula' theme as they aptly name it. Soothing for the eyes!

Check out http://intellij.com/idea/whatsnew/ for more information, and best of all they have a free Community Edition to play with! Eclipse users, give it a shot! : )

torsdag 22 november 2012

Android : Creating a custom View (a Circle!)

I've played around with building custom views that can be embedded and styled through XML.
Google has a pretty good tutorial on making them here.

First the requirements, i didn't want to create the View by code and then attach it to a view. Not reusable. I wanted to just be able to type the classname in my layout file and style it as necessary.

First our custom styleable attributes.

values/attrs.xml
<resources>
    <declare-styleable name="circleview">
        <attr name="cRadius" format="integer" />
        <attr name="cFillColor" format="color" />
        <attr name="cStrokeColor" format="color" />
        <attr name="cAngleStart" format="integer" />
        <attr name="cAngleEnd" format="integer" />
    </declare-styleable>
</resources>

As you can probably guess we will have a nice little circle which we can display in a few ways, not so usuable. ( Except to display a Pac-Man ! : )

Lets look at the main layout that incorparate my CircleView class.

layout/main.xml
<?xml version="1.0" encoding="utf-8"?>
<LinearLayout xmlns:android="http://schemas.android.com/apk/res/android"
              xmlns:circleview="http://schemas.android.com/apk/res/se.adanware.canvasplaying"
              android:orientation="vertical"
              android:layout_width="fill_parent"
              android:layout_height="fill_parent">
    <TextView
            android:layout_width="fill_parent"
            android:layout_height="wrap_content"
            android:text="Hello World, CanvasActivity"
            />
    <se.adanware.canvasplaying.CircleView
            android:id="@+id/pieCircle"
            android:layout_width="wrap_content"
            android:layout_height="wrap_content"
            circleview:cFillColor="#DDaa99"
            circleview:cStrokeColor="@android:color/white"
            circleview:cRadius="80"
            circleview:cAngleStart="30"
            circleview:cAngleEnd="290"
            />
    <TextView
            android:layout_width="fill_parent"
            android:layout_height="wrap_content"
            android:text="Hello World, CanvasActivity"
            />
</LinearLayout>

Notice the xmlns:circleview namespace that's called the same as the packagename. The prefix 'circleview' can be whatever we want. I added the two TextViews just to see the span of the height at the beginning.
As you can see we can shape our circle and draw it as we like either put in a radius (in pixels) or we can make use of the height or width. It'll calculate the circle radius so it fits depending on the height or width if the cRadius attribute is omitted. Screenshot of above settings :

Lets move on to the CircleView class. All views that wants to be emedded in xml need to have, quote
'To allow the Android Developer Tools to interact with your view, at a minimum you must provide a constructor that takes a Context and an AttributeSet object as parameters. This constructor allows the layout editor to create and edit an instance of your view.' 
Make sure your constructor has public access, otherwise it's locked to your own package.

src/CircleView.java
package se.adanware.canvasplaying;

import android.content.Context;
import android.content.res.TypedArray;
import android.graphics.Canvas;
import android.graphics.Paint;
import android.graphics.RectF;
import android.util.AttributeSet;
import android.util.Log;
import android.view.View;

public class CircleView extends View {

        private Paint circlePaint;
        private Paint circleStrokePaint;
        private RectF circleArc;

        // Attrs
        private int circleRadius;
        private int circleFillColor;
        private int circleStrokeColor;
        private int circleStartAngle;
        private int circleEndAngle;

    public CircleView(Context context, AttributeSet attrs) {

        super(context, attrs);
        init(attrs); // Read all attributes

        circlePaint = new Paint(Paint.ANTI_ALIAS_FLAG);
        circlePaint.setStyle(Paint.Style.FILL);
        circleStrokePaint = new Paint(Paint.ANTI_ALIAS_FLAG);
        circleStrokePaint.setStyle(Paint.Style.STROKE);
        circleStrokePaint.setStrokeWidth(2);
        circleStrokePaint.setColor(circleStrokeColor);
    }

    public void init(AttributeSet attrs)
    {
        // Go through all custom attrs.
        TypedArray attrsArray = getContext().obtainStyledAttributes(attrs, R.styleable.circleview);
        circleRadius = attrsArray.getInteger(R.styleable.circleview_cRadius, 0);
        circleFillColor = attrsArray.getColor(R.styleable.circleview_cFillColor, 16777215);
        circleStrokeColor = attrsArray.getColor(R.styleable.circleview_cStrokeColor, -1);
        circleStartAngle = attrsArray.getInteger(R.styleable.circleview_cAngleStart, 0);
        circleEndAngle = attrsArray.getInteger(R.styleable.circleview_cAngleEnd, 360);
        // Google tells us to call recycle.
        attrsArray.recycle();
    }

    @Override
    protected void onDraw(Canvas canvas) {
        // Move canvas down and right 1 pixel.
        // Otherwise the stroke gets cut off.
        canvas.translate(1,1);
        circlePaint.setColor(circleFillColor);
        canvas.drawArc(circleArc, circleStartAngle, circleEndAngle, true, circlePaint);
        canvas.drawArc(circleArc, circleStartAngle, circleEndAngle, true, circleStrokePaint);
    }

    @Override protected void onMeasure(int widthMeasureSpec, int heightMeasureSpec)
    {

        int measuredWidth = measureWidth(widthMeasureSpec);
        if(circleRadius == 0) // No radius specified.
        {                     // Lets see what we can make.
            // Check width size. Make radius half of available.
            circleRadius = measuredWidth / 2;
            int tempRadiusHeight = measureHeight(heightMeasureSpec) / 2;
            if(tempRadiusHeight < circleRadius)
                // Check height, if height is smaller than
                // width, then go half height as radius.
                circleRadius = tempRadiusHeight;
        }
        // Remove 2 pixels for the stroke.
        int circleDiameter = circleRadius * 2 - 2;
        // RectF(float left, float top, float right, float bottom)
        circleArc = new RectF(0, 0, circleDiameter, circleDiameter);
        int measuredHeight = measureHeight(heightMeasureSpec);
        setMeasuredDimension(measuredWidth, measuredHeight);
        Log.d("onMeasure() ::", "measuredHeight =>" + String.valueOf(measuredHeight) + "px measuredWidth => " + String.valueOf(measuredWidth) + "px");
    }

    private int measureHeight(int measureSpec) {
        int specMode = MeasureSpec.getMode(measureSpec);
        int specSize = MeasureSpec.getSize(measureSpec);
        int result = 0;
        if (specMode == MeasureSpec.AT_MOST) {
            result = circleRadius * 2;
        } else if (specMode == MeasureSpec.EXACTLY) {
            result = specSize;
        }
        return result;
    }

    private int measureWidth(int measureSpec) {
        int specMode = MeasureSpec.getMode(measureSpec);
        int specSize = MeasureSpec.getSize(measureSpec);
        int result = 0;
        if (specMode == MeasureSpec.AT_MOST) {
            result = specSize;
        } else if (specMode == MeasureSpec.EXACTLY) {
            result = specSize;
        }
         return result;
    }
}

As you can see it's really easy. Measure the view and draw accordingly, no failsafe if you specify the radius to large but it's easy to implement though, just check the radius with the width and scale it down. This was just a small example on constructing custom views.

src/CanvasActivity.java
package se.adanware.canvasplaying;

import android.app.Activity;
import android.os.Bundle;

public class CanvasActivity extends Activity {
    /**
     * Called when the activity is first created.
     */
    @Override
    public void onCreate(Bundle savedInstanceState) {
        super.onCreate(savedInstanceState);
        setContentView(R.layout.main);
    }
}

I'll make another post about adding data to the custom view when i have the time!


tisdag 18 september 2012

Misc : Been moving, renovating.

So me and my fiancee have finally moved to our own place. Been kinda hectic so haven't had much time doing any coding or playing with Android or Java. Living room is finally ready, i did a little media wall to hide all the cables to the speakers and television.


After wallpaper and everything mounted.


Lousy picture, now i just need to choose a media streamer / extender. Before we had the computer in the living room so we just used a simple hdmi cable to the reciever and started everything that way. Alas no more. Been doing some research and havent gotten any wiser.

Requirements:

  • ISO support. DVD & Bluray with menu support.
  • HD audio formats.
  • Preferrebly 3D support (Used once a year : )
  • Fast GUI
  • All regular media containers, MKV w/ embedded subtitles. External subtitles, DTS, etc.
Looked at building a small HTPC but would be simpler with a little box that can stream everything.
I've eyed the Mede8er MED1000X3D , fairly recent product with hopefully some good support. The design doesnt really impress me but hopefully the inside does. I'll update the post with the solution i take and a mini review.

MED1000X3D Mini Review :

A MED1000X3D have been bought and tried out in the living room. First time i started it, remote control functions never got any response or lagged really bad. I was nervous.

A quick restart and it behaves better. This review is based mostly on it’s capabilities on movie playback of different formats. I’ve never used the drivebay inside the machine, i just stream from my computer and it’s connected to the home network by wire.

First of, it handles all the usual movie containers perfect, MKV, AVI, and DVD ISO files, etc. HD Audio tracks which was a buying point for me works nicely and gets decoded by the reciever.

Bluray can be played either from an ISO file or from the correct directory structure (i.e a BDMV folder) it will play it as a disc. However the menu on most of my new ones i’ve tried doesn’t work and will probably never get implemented. Quote from their forum :
‘No media streamer will offer this as a Blu-ray stack is necessary, along with a full license, to support full menus. Plus, doing so means you must implement Cinavia copy protection, which renders Blu-ray backups (ISO's) useless.’

Subtitles which i use is also nice, can be resized and moved around. Need ‘em, otherwise i need to crank the volume up so high. Last function i played around with is their custom software for building a ‘Movie Jukebox’, just place a file with a NFO file extension  with the correct IMDB url in the movie folder and the program will do the rest. Cover, artwork, etc.

There are a few Internet related apps included in their software. Youtube, Internet Radio, Weather and some video feeds.  All in all i’m happy.

Minus-
Remote Control, kinda plastic and needs accurate pointing to the device.
Price, well, based on the chipset other manufacturers use for their Media Extenders  it’s a bit hefty. They do include a HDMI cable though. : )  

My score: 8/10


torsdag 5 juli 2012

Android : Simple HTML parsing & image downloader using AsyncTask

A barebone html parser and a simple image downloader for a certain comic. This one may please your girlfriend or wife. I'll show a simple DefaultHttpClient and ResponseHandle in conjunction with a AsyncTask class.(Although with almost no error checking) The comic we want is Love Is, i've stripped it so it's just a ImageView for the image, a button for Previous/Next and a simple TextView for the date.

Lets start with the simple helper class that will connect to the homepage, parse the html and download the image.

Update, GoComics.com have removed their Love Is... comic strip. Updated it with another page.

(note only updated LoveIsParser.java, they use strange dates for their pictures, reused ones ? So need to store url to previous and next picture before closing the AsyncTask... just did a quick hack to get it working again.)

src/LoveIsParser.java
import android.graphics.Bitmap;
import android.graphics.BitmapFactory;
import android.util.Log;
import org.apache.http.HttpResponse;
import org.apache.http.client.methods.HttpGet;
import org.apache.http.impl.client.BasicResponseHandler;
import org.apache.http.impl.client.DefaultHttpClient;

import java.io.BufferedInputStream;
import java.io.InputStream;
import java.util.Calendar;
import java.util.regex.Matcher;
import java.util.regex.Pattern;

public class LoveIsParser {

    final String loveIsUrl = "http://loveiscomix.com/";
    private String urlImage;
    private Bitmap loveIsBitmap;
    private Pattern patternForImage = Pattern.compile("static/loveisbnk/.........gif");
    public LoveIsParser()
    { }

    public Bitmap getLoveIsBitmap()
    {
        return loveIsBitmap;
    }

    public boolean downloadImage(Calendar c)
    {
        //String urlExtension = c.get(Calendar.YEAR) + "/" + padString(c.get(Calendar.MONTH)+1) + "/" + padString(c.get(Calendar.DAY_OF_MONTH));
        //Log.d("LoveIS Url:", loveIsUrl + urlExtension);
        DefaultHttpClient httpClient = new DefaultHttpClient();
        BasicResponseHandler responseHandler = new BasicResponseHandler();
        HttpGet request = new HttpGet(loveIsUrl);
        try
        {
            String htmlBody = httpClient.execute(request, responseHandler);
            Matcher m = patternForImage.matcher(htmlBody);
            if(m.find())
            {
                urlImage = m.group();
                urlImage = loveIsUrl + urlImage;
                Log.d("Image Url:", urlImage);
                request = new HttpGet(urlImage);
                HttpResponse response = httpClient.execute(request);
                InputStream in = response.getEntity().getContent();
                BufferedInputStream bis = new BufferedInputStream(in, 8192);
                loveIsBitmap = BitmapFactory.decodeStream(bis);
                bis.close();
                in.close();
                return true;
            }
        }
        catch (Exception e)
        {
            Log.d("Exception", e.toString());
        }
        return  false;
    }

    public String padString(int number)
    {
        return String.format("%02d", number);
    }
}

Most is self explanatory, downloadImage function takes a Calendar, parses the date and completes the url.
Adding 1 to the month as it's zero-based and using padString to pad with a 0 if it's singledigit.

Lets move on to the layout.

layout/main.xml
<?xml version="1.0" encoding="utf-8"?>
<LinearLayout xmlns:android="http://schemas.android.com/apk/res/android"
              android:orientation="vertical"
              android:layout_width="fill_parent"
              android:layout_height="fill_parent">

    <ImageView  android:id="@+id/ivLove"
                android:layout_height="wrap_content"
                android:layout_width="fill_parent"/>

    <TextView android:id="@+id/tvDate"
              android:layout_height="wrap_content"
              android:layout_width="wrap_content"/>
    <Button android:layout_height="wrap_content"
            android:layout_width="fill_parent"
            android:id="@+id/btnPrevious"
            android:text="Previous"/>
    <Button android:layout_height="wrap_content"
            android:layout_width="fill_parent"
            android:id="@+id/btnNext"
            android:text="Next"/>
</LinearLayout>

And lastly our launcher activity.

src/MainActivity.java

import android.app.ProgressDialog;
import android.content.Context;
import android.graphics.Bitmap;
import android.graphics.BitmapFactory;
import android.net.ConnectivityManager;
import android.net.NetworkInfo;
import android.os.AsyncTask;
import android.os.Bundle;
import android.support.v4.app.FragmentActivity;
import android.view.View;
import android.widget.Button;
import android.widget.ImageView;
import android.widget.TextView;
import android.widget.Toast;

import java.util.Calendar;

public class MainActivity extends FragmentActivity {

    Calendar c;
    TextView tvDate;
    @Override
    protected void onCreate(Bundle savedInstanceState) {
        super.onCreate(savedInstanceState);
        setContentView(R.layout.loveis);
        c = Calendar.getInstance();
        ImageView imageView = (ImageView) findViewById(R.id.ivLove);
        tvDate = (TextView) findViewById(R.id.tvDate);
        tvDate.setText(c.getTime().toLocaleString());
        Button btnPrevious = (Button) findViewById(R.id.btnPrevious);
        Button btnNext = (Button) findViewById(R.id.btnNext);
        if(isOnline())
            new GetAndSetImage().execute(c);
        else
            Toast.makeText(this, "No Internet connection found.", Toast.LENGTH_LONG).show();

        btnPrevious.setOnClickListener(new View.OnClickListener() {
            @Override
            public void onClick(View view) {
                c.add(Calendar.DATE, -1);
                tvDate.setText(c.getTime().toLocaleString());
                new GetAndSetImage().execute(c);
            }
        });

        btnNext.setOnClickListener(new View.OnClickListener() {
            @Override
            public void onClick(View view) {
                c.add(Calendar.DATE, 1);
                tvDate.setText(c.getTime().toLocaleString());
                new GetAndSetImage().execute(c);
            }
        });
    }

    private class GetAndSetImage extends AsyncTask<Calendar, Void, Bitmap>
    {
        ProgressDialog pd;

        @Override
        protected Bitmap doInBackground(Calendar... c) {
            LoveIsParser parser = new LoveIsParser();
            if(parser.downloadImage(c[0]))
                return parser.getLoveIsBitmap();
            else
            {   // We just return a drawable if there's an error in the download.
                return BitmapFactory.decodeResource(getResources(), R.drawable.icon);
            }
        }

        @Override
        protected void onPreExecute()
        {
            pd = new ProgressDialog(MainActivity.this);
            pd.setProgressStyle(ProgressDialog.STYLE_SPINNER);
            pd.setMessage("Downloading image...");
            pd.show();
        }

        @Override
        protected void onPostExecute(Bitmap bm)
        {
            pd.dismiss();
            ImageView iv = (ImageView) findViewById(R.id.ivLove);
            iv.setImageBitmap(bm);
        }
    }

    public boolean isOnline() {
        ConnectivityManager cm =
                (ConnectivityManager) getSystemService(Context.CONNECTIVITY_SERVICE);
        NetworkInfo netInfo = cm.getActiveNetworkInfo();
        if (netInfo != null && netInfo.isConnectedOrConnecting()) {
            return true;
        }
        return false;
    }

}

Buttons decrease and increase the date when clicked and download the image based on the current date using a simple AsyncTask that display a 'Progress Dialog' while it's downloading. 

Now just flash it up a bit (hearts and red layout ^^) and install on your girlfriends phone for some extra romance, or implement sharing so you can easily send the picture as an MMS whenever you want.

Screenshot: