tisdag 27 mars 2012

Android : Custom spinner with custom object!

Lets spin forward by implementing a custom spinner with a custom drop down view!
Using style= tag on the spinner didnt work for me to override the styles, so i just changed the background.
First a custom drawable selector with the appropiate images.

drawable/btn_dropdown.xml
<?xml version="1.0" encoding="utf-8" ?>
<selector xmlns:android="http://schemas.android.com/apk/res/android">
    <item android:state_window_focused="false" android:state_enabled="true" android:drawable="@drawable/btn_dropdown_normal" />
    <item android:state_pressed="true" android:drawable="@drawable/btn_dropdown_pressed" />
    <item android:state_focused="true" android:state_enabled="true" android:drawable="@drawable/btn_dropdown_pressed" />
    <item android:state_enabled="true" android:drawable="@drawable/btn_dropdown_normal" />
    <item android:drawable="@drawable/btn_dropdown_normal" />
</selector>

Next, i just reworked the btn_dropdown_* images that ships with the Android SDK. They should be located in ~androidsdkroot/platforms/android-(yourversion)/data/res/drawable-hdpi. There's 5 different states that can be used but i just made images for two. Normal & pressed.

Okay, the images done! Just need to change the spinner background to @drawable/btn_dropdown.xml to get our own look! I still use the android.R.layout.simple_spinner_item to display the objects in my spinner.
Lets get going, the main layout:

layout/main.xml
<?xml version="1.0" encoding="utf-8"?>
<LinearLayout xmlns:android="http://schemas.android.com/apk/res/android"
    android:orientation="vertical"
    android:layout_width="fill_parent"
    android:layout_height="fill_parent">
    <Button
        android:layout_width="fill_parent"
        android:layout_height="wrap_content"
        android:text="Custom Spinner with custom data" />
    <Spinner  android:id="@+id/SpinnerOrginal"
              android:layout_width="fill_parent"
              android:layout_height="wrap_content"
              />
    <Spinner android:id="@+id/SpinnerCustom"
             android:layout_width="fill_parent"
             android:layout_height="wrap_content"
             android:background="@drawable/btn_dropdown"
             />
    <Button android:id="@+id/buttonUseItem"
            android:layout_width="fill_parent"
            android:layout_height="wrap_content"
            android:text="Use Selection"/>
    <TextView android:id="@+id/myTextView"
              android:layout_height="wrap_content"
              android:layout_width="wrap_content"/>
</LinearLayout>
Next up our helper class from the previous entry with a little modification.
src/CountryInfo.java
public class CountryInfo {
    private String countryName;
    private long countryPopulation;
    private int countryFlag; // Populate it with our resource ID for the correct image.
    
    public CountryInfo(String cName, long cPopulation, int flagImage)
    {
        countryName = cName;
        countryPopulation = cPopulation;
        countryFlag = flagImage;
    }
    public String getCountryName()
    {
        return countryName;
    }
    public long getCountryPopulation()
    {
        return countryPopulation;
    }
    public int getCountryFlag()
    {
        return countryFlag;
    }
    public String toString()
    {
        return countryName;
    }
}
And lastly our main activity with our CountryAdapter class that will implement the view.
src/SpinnerTest.java (First part)

import android.app.Activity;
import android.os.Bundle;
import android.view.LayoutInflater;
import android.view.View;
import android.view.ViewGroup;
import android.widget.*;
import java.util.ArrayList;

public class SpinnerTest extends Activity
{
    
    Button button_UseSelectedItem;
    Spinner mySpinner;
    TextView myTextView;
    ArrayList<CountryInfo> myCountries;

    @Override
    public void onCreate(Bundle savedInstanceState)
    {
        super.onCreate(savedInstanceState);
        myCountries = populateList();
        setContentView(R.layout.main);
        mySpinner = (Spinner) findViewById(R.id.SpinnerCustom);
        Spinner OrginalSpinner = (Spinner) findViewById(R.id.SpinnerOrginal);
        button_UseSelectedItem = (Button) findViewById(R.id.buttonUseItem);
        myTextView = (TextView) findViewById(R.id.myTextView);

        CountryAdapter myAdapter = new CountryAdapter(this, android.R.layout.simple_spinner_item, myCountries);

        mySpinner.setAdapter(myAdapter);
        OrginalSpinner.setAdapter(myAdapter);
        
        button_UseSelectedItem.setOnClickListener(new View.OnClickListener() {
            @Override
            public void onClick(View view) {
                // Can also use mySpinner.setOnItemClickListener(......) 
                // Using a separate button here as there's often other data to select
                // or if you choose the wrong item.
                CountryInfo myCountry;
                if(mySpinner.getSelectedItem() != null)
                {
                    myCountry = (CountryInfo) mySpinner.getSelectedItem();
                    myTextView.setText(String.format("Country: " + myCountry.getCountryName() + "\t Population: " + myCountry.getCountryPopulation()));
                }
            }
        });
    }

    public ArrayList<CountryInfo> populateList()
    {
        ArrayList<CountryInfo> myCountries = new ArrayList<CountryInfo>();
        myCountries.add(new CountryInfo("USA", 308745538, R.drawable.usa)); // Image stored in /drawable
        myCountries.add(new CountryInfo("Sweden", 9482855, R.drawable.sweden));
        myCountries.add(new CountryInfo("Canada", 34018000, R.drawable.canada));
        return myCountries;
    }


As you see it looks like the previous one except we have created a custom adapter for our new spinner. populateList() method also gets the ints from the icons i have in the drawable/ directory.
Okay lets continue with the adapter!
src/SpinnerTest.java (2nd part)
public class CountryAdapter extends ArrayAdapter<CountryInfo>
    {
        private Activity context;
        ArrayList<CountryInfo> data = null;

        public CountryAdapter(Activity context, int resource, ArrayList<CountryInfo> data)
        {
            super(context, resource, data);
            this.context = context;
            this.data = data;
        }

        @Override
        public View getView(int position, View convertView, ViewGroup parent) 
        {   // Ordinary view in Spinner, we use android.R.layout.simple_spinner_item
            return super.getView(position, convertView, parent);   
        }

        @Override
        public View getDropDownView(int position, View convertView, ViewGroup parent)
        {   // This view starts when we click the spinner.
            View row = convertView;
            if(row == null)
            {
                LayoutInflater inflater = context.getLayoutInflater();
                row = inflater.inflate(R.layout.spinner_layout, parent, false);
            }

            CountryInfo item = data.get(position);

            if(item != null)
            {   // Parse the data from each object and set it.
                ImageView myFlag = (ImageView) row.findViewById(R.id.imageIcon);
                TextView myCountry = (TextView) row.findViewById(R.id.countryName);
                if(myFlag != null)
                {
                    myFlag.setBackgroundDrawable(getResources().getDrawable(item.getCountryFlag()));
                }
                if(myCountry != null)
                    myCountry.setText(item.getCountryName());

            }

            return row;
        }
    }
}


getView() method could be skipped, typed it along for clarity. getDropDownView() inflates my own layout for the drop down list. I just inflate it and set the corresponding ImageView & TextView from each object in the ArrayList. Plenty of information if you google ListView and custom adapters.

layout/spinner_layout.xml ( LinearLayout with a ImageView and TextView )

<?xml version="1.0" encoding="utf-8" ?>
<LinearLayout xmlns:android="http://schemas.android.com/apk/res/android"
              android:layout_width="fill_parent"
              android:layout_height="wrap_content"
              android:orientation="horizontal"
              android:background="@drawable/bluegradient">
<ImageView android:id="@+id/imageIcon"
           android:layout_width="wrap_content"
           android:layout_height="wrap_content"
           android:background="@drawable/canada"/>
<TextView android:id="@+id/countryName"
          android:singleLine="true"
          android:layout_width="match_parent"
          android:layout_height="match_parent"
          android:gravity="center"
          android:ellipsize="marquee"
          style="@style/SpinnerText"/>
</LinearLayout>

drawable/bluegradient.xml (Our background in the dropdown view, changes when item is pressed)
<?xml version="1.0" encoding="utf-8"?>
<selector xmlns:android="http://schemas.android.com/apk/res/android">
    <item android:state_pressed="true" >
        <shape>
            <solid
                android:color="#2183b0" />
            <stroke
                android:width="1dp"
                android:color="#adc6e8" />
           <corners
                android:radius="4dp" />
            <padding
                android:left="4dp"
                android:top="4dp"
                android:right="4dp"
                android:bottom="4dp" />
        </shape>
    </item>
    <item>
        <shape>
            <gradient
                android:startColor="#2183b0"
                android:endColor="#7cbfde"
                android:angle="270" 
                android:type="linear"
                />
            <stroke
                android:width="1dp"
                android:color="#2183b0" />
            <corners
                android:radius="4dp" />
            <padding
                android:left="0dp"
                android:top="4dp"
                android:right="0dp"
                android:bottom="4dp" />
        </shape>
    </item>
</selector>


That's it! Final result, spinner closed, and open!


fredag 23 mars 2012

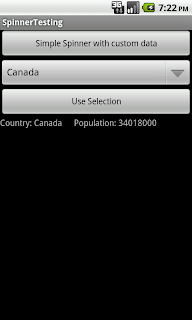
Android : Using a Spinner with custom object


Spinners is really easy to work with if you just need to display your object with it's toString() function.

First a simple layout: 

<?xml version="1.0" encoding="utf-8"?>
<LinearLayout xmlns:android="http://schemas.android.com/apk/res/android"
    android:orientation="vertical"
    android:layout_width="fill_parent"
    android:layout_height="fill_parent"
    >
    <Button android:id="@+id/buttonPopulate"
        android:layout_width="fill_parent"
        android:layout_height="wrap_content"
        android:text="Simple Spinner with custom data" />
    <Spinner  android:id="@+id/mySpinner"
              android:layout_width="fill_parent"
              android:layout_height="wrap_content"/>
    <Button android:id="@+id/buttonUseItem"
            android:layout_width="fill_parent"
            android:layout_height="wrap_content"
            android:text="Use Selection"/>
    <TextView android:id="@+id/myTextView"
              android:layout_height="wrap_content"
              android:layout_width="wrap_content"/>
</LinearLayout>

Next up, a simple class to populate our Spinner with!

public class CountryInfo {
    private String countryName;
    private long countryPopulation;
    
    public CountryInfo(String cName, long cPopulation)
    {
        countryName = cName;
        countryPopulation = cPopulation;
    }
    
    public String getCountryName()
    {
        return countryName;
    }

    public long getCountryPopulation()
    {
        return countryPopulation;
    }

    public String toString()
    {
        return countryName;
    }
}

No odd behavior here, and last our SpinnerTest class
import android.app.Activity;
import android.os.Bundle;
import android.view.View;
import android.widget.*;
import java.util.ArrayList;

public class SpinnerTest extends Activity
{
    
    Button button_UseSelectedItem;
    Spinner mySpinner;
    TextView myTextView;
    ArrayList<CountryInfo> myCountries;

    @Override
    public void onCreate(Bundle savedInstanceState)
    {
        super.onCreate(savedInstanceState);
        myCountries = populateList();
        setContentView(R.layout.main);
        mySpinner = (Spinner) findViewById(R.id.mySpinner);
        button_UseSelectedItem = (Button) findViewById(R.id.buttonUseItem);
        myTextView = (TextView) findViewById(R.id.myTextView);
        
        ArrayAdapter<CountryInfo> myAdapter = new ArrayAdapter<CountryInfo>(this, android.R.layout.simple_spinner_item, myCountries);
        mySpinner.setAdapter(myAdapter);
        
        button_UseSelectedItem.setOnClickListener(new View.OnClickListener() {
            @Override
            public void onClick(View view) {
                // Can also use mySpinner.setOnItemClickListener(......) 
                // Using a separate button here as there's often other data to select
                // or if you choose the wrong item.
                CountryInfo myCountry;
                if(!(mySpinner.getSelectedItem() == null))
                {
                    myCountry = (CountryInfo) mySpinner.getSelectedItem();
                    myTextView.setText(String.format("Country: " + myCountry.getCountryName() + "\t Population: " + myCountry.getCountryPopulation()))
            }
        });
    }

    public ArrayList<CountryInfo> populateList()
    {
        ArrayList<CountryInfo> myCountries = new ArrayList<CountryInfo>();
        myCountries.add(new CountryInfo("USA", 308745538));
        myCountries.add(new CountryInfo("Sweden", 9482855));
        myCountries.add(new CountryInfo("Canada", 34018000));
        return myCountries;
    }
}

Simple! Just using the internal android.R.layout.simple_spinner_item layout, remember to create a toString() for your custom object.

Link to source for android.R.layout_simple_spinner_item


I'll add another post later for customizing your spinner and adapter.

tisdag 13 mars 2012

Android : Customizing Activity Title Bars


First, how to remove them ? Two easy ways:
requestWindowFeature(Window.FEATURE_NO_TITLE);
We need to do it for each activity or we can edit androidmanifest.xml  :
<application android:icon="@drawable/icon" android:label="My Application" android:theme="@android:style/Theme.NoTitleBar">

No titlebars in the whole application, can also be set in the <activity> to hide specific ones.
Now then,  i like a CUSTOM titlebar!

First create a XML in values,.


values/styles.xml

<?xml version="1.0" encoding="utf-8"?>
<resources>
    <style name="CustomTitleBarTheme" parent="android:Theme">
        <item name="android:windowTitleSize">25dp</item>
        <item name="android:windowTitleBackgroundStyle">@style/titleBarBackgroundStyle</item>
    </style>
    <style name="titleBarBackgroundStyle">
        <item name="android:background">@android:color/transparent</item>
    </style>
</resources>


It's pretty self-explanatory, you can browse the original settings at :
and

layout/customtitlebar.xml - Layout for our own titlebar!

<?xml version="1.0" encoding="utf-8"?>

<RelativeLayout android:id="@+id/myTitleBar"
                xmlns:android="http://schemas.android.com/apk/res/android"
                android:layout_height="fill_parent"
                android:layout_width="fill_parent"
                android:orientation="horizontal"
                android:background="#2183b0"

                >
    <TextView android:id="@+id/title"
              android:layout_width="wrap_content"
              android:layout_height="wrap_content"
              android:textSize="15sp"
              android:textStyle="bold"
              android:text="Custom Title Bars"
              android:layout_alignParentLeft="true"
              />
    <Button android:id="@+id/titlebarButton"
            android:layout_height="wrap_content"
            android:layout_width="wrap_content"
            android:text="Click Me!"
            android:textSize="12sp"
            android:layout_alignParentRight="true"
            android:background="@drawable/gradientshape"

            />
</RelativeLayout>
 

layout/main.xml - Our main view
<?xml version="1.0" encoding="utf-8"?>
<LinearLayout xmlns:android="http://schemas.android.com/apk/res/android"
    android:id="@+id/myLayout"
    android:orientation="vertical"
    android:layout_width="fill_parent"
    android:layout_height="fill_parent"
    >
<TextView  
    android:layout_width="fill_parent" 
    android:layout_height="wrap_content" 
    android:text="... Custom titlebars."
    />
    <Button android:id="@+id/mainButton"
            android:layout_height="wrap_content"
            android:layout_width="fill_parent"
            android:text="My Button"/>
</LinearLayout>

drawable/gradientshape.xml - Added a little gradient drawable that i use sometimes.
<?xml version="1.0" encoding="utf-8"?>
<selector xmlns:android="http://schemas.android.com/apk/res/android">
    <item android:state_pressed="true" >
        <shape>
            <solid
                android:color="#2183b0" />
            <stroke
                android:width="1dp"
                android:color="#adc6e8" />
           <corners
                android:radius="4dp" />
            <padding
                android:left="0dp"
                android:top="4dp"
                android:right="4dp"
                android:bottom="0dp" />
        </shape>
    </item>
    <item>
        <shape>
            <gradient
                android:startColor="#2183b0"
                android:endColor="#7cbfde"
                android:angle="270" 
                android:type="linear"
                />
            <stroke
                android:width="1dp"
                android:color="#2183b0" />
            <corners
                android:radius="4dp" />
            <padding
                android:left="0dp"
                android:top="4dp"
                android:right="0dp"
                android:bottom="4dp" />
        </shape>
    </item>
</selector>

src/MainActivity.java - And the source code...
import android.app.Activity;
import android.graphics.drawable.Drawable;
import android.os.Bundle;
import android.view.View;
import android.view.Window;
import android.widget.Button;
import android.widget.LinearLayout;

public class MainActivity extends Activity
{
    private LinearLayout myLayout;
    @Override
    public void onCreate(Bundle savedInstanceState)
    {
        super.onCreate(savedInstanceState);
        // We like a custom titlebar.
        requestWindowFeature(Window.FEATURE_CUSTOM_TITLE);
        setContentView(R.layout.main);
        // Lets set the R.layout.customtitlebar to the window.
        getWindow().setFeatureInt(Window.FEATURE_CUSTOM_TITLE, R.layout.customtitlebar);
        // Then like usual, locate the widgets and use 'em!
        Button buttonTitleBar = (Button) findViewById(R.id.titlebarButton);
        myLayout = (LinearLayout) findViewById(R.id.myLayout);
        buttonTitleBar.setOnClickListener(new View.OnClickListener() {
            @Override
            public void onClick(View view) {
                Drawable myDrawable = getResources().getDrawable(R.drawable.gradientshape);
                myLayout.setBackgroundDrawable(myDrawable);
            }
        });
    }
}

All good to! Just remember to add the theme to your activity also!
<activity android:name="MainActivity" android:theme="@style/CustomTitleBarTheme"
                  android:label="@string/app_name">

And a screenshot after a click..
Time for some reading, nightie!